
The Paint Bucket applies a material: a color, a texture image, or both. A face is one flat surface in your model.
01 / PAINT & INHERITANCE
Where the paint
comes from
You paint a group blue, but one face stays oak. The face’s own paint takes priority.
A face set to Default has no paint of its own. It can show its group’s material instead. This is called inheritance.
Paint on each part
Want the group’s paint to show? Set the face to Default. Paint the face directly when it needs a different finish.
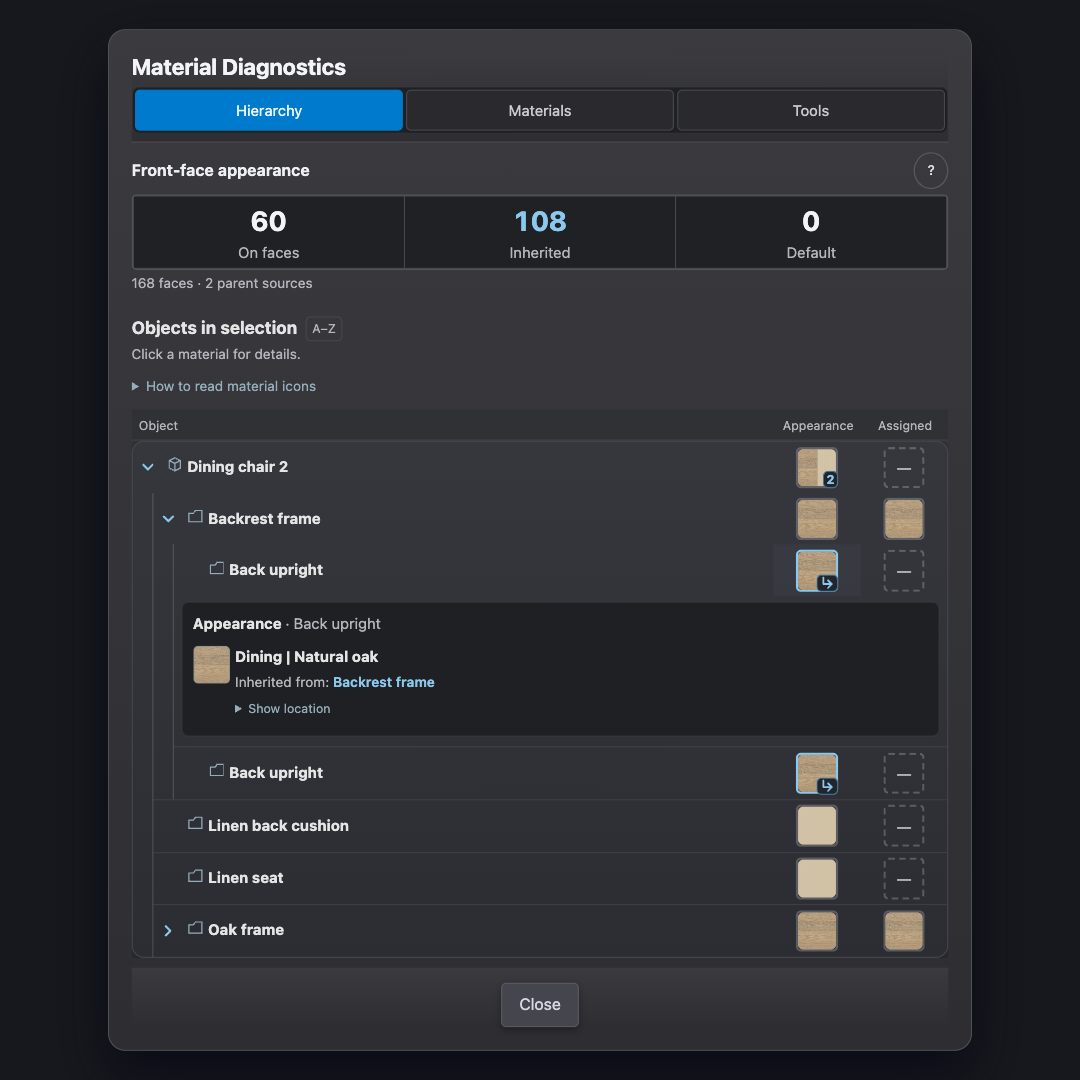
Find the source in UMM
In Material Diagnostics, Appearance is what you see. Assigned is the paint on the face or object itself.
Find where the paint comes from →What if one group is inside another?
A Default face uses the nearest painted group or component around it. Default groups let paint from an outer group show through. If none has paint, SketchUp uses your model style’s colors.
03 / TEXTURE SIZE & POSITION
Set the texture’s
size and direction
A wood texture is an image placed on a face. You can turn or resize that image without changing the wood material itself.
Change the finish
Edit the material’s color or image. Other objects using that material share the change.
Edit Material →Change how it fits
Move, rotate or resize the image on a face. This is texture mapping. Component copies using that face can change too.
Texture Transform →Texture mapping
Adjust the image. The surface stays 1200 × 600 mm.
The outline shows one whole texture image. Copies of it fill the surface.
Scale
Increase the image size to make the pattern larger.
Rotation
Positive angles rotate clockwise around the marked center.
Position
+ moves right / down; − moves left / up.
Use the sliders or enter values to adjust the image.
The outline shows one whole image. At 300 mm, that square covers 300 × 300 mm of the model. The brick image contains several bricks; the number is not the width of one brick.
Texture size or image quality?
Texture size is how much surface an image covers. Resolution is how many pixels it contains. Enlarging a texture makes the pattern bigger, but adds no detail.
Changing texture dimensions in the material affects its other uses. To adjust a particular face, change its mapping instead. Check component copies and any faces already positioned by hand.
Why UMM measures movement in texture tiles
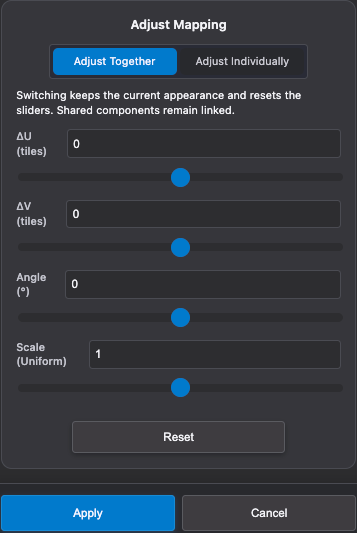
One texture tile is one complete image. With a 300 mm image size, half a tile spans 150 mm.
For a simple face at Scale 1 and Angle 0, ΔU = −0.5 moves the visible pattern 150 mm in positive U. U follows the texture, so it may not point right on screen. This assumes no extra scaling or distortion.
A whole-tile move can look unchanged because the image repeats.
04 / SEAMS & CURVED SURFACES
Make the pattern
meet at the join
Two faces can use the same brick material but show a seam. The image must line up on both sides.
The right-hand image starts lower, so the brick rows do not meet.
Match the image size and position to align the brick rows.
The image turns with each face. Check that the pattern meets at the corner.
The image comes from one direction and stretches where the surface turns away.
A smooth curve is also made of flat faces. Turn on Hidden Geometry to see the joins, then check the pattern across them.
Projection is not wrapping
Projecting a picture onto a curved wall sends the image in one direction. It stretches where the wall turns away. Wrapping a strip around the wall follows the surface instead.
SketchUp reference: projecting textures onto curves ↗When a component is stretched or mirrored
Copies with the same texture settings can look different after rotating, scaling or mirroring. On a flat face painted directly with a texture, stretching its component stretches the pattern too. Inherited, projected and distorted textures need separate checks.
SketchUp reference: scaling components ↗05 / FRONT & BACK FACES
Paint does not turn
a face around
Every face has a front and a back. You can paint both, but painting the back does not make it the front.
- Front material
- Oak
- Back material
- Blue paint
- Face reversed?
- No
You are viewing the front, painted oak. The view changed; the face did not turn around.
Your SketchUp style may use different front and back colors.Check which side faces out
Use Monochrome or UMM Check Faces to look past the paint. Use SketchUp’s Reverse Faces when a face points the wrong way.
Use Check Faces →Clear paint separately
Clear Back Materials removes back-face paint. It does not reverse faces.
Clear back materials →Renderers handle back faces differently. Test a small export, even when the model looks right in SketchUp.
SketchUp reference: front and back faces ↗06 / REPLACE & CLEAN UP
Keep the materials
you still need
A finish you cannot see may still be used by a hidden object or a saved design option.
Edit
Change a material, such as making its oak darker.
Replace
Swap one material for another on chosen objects.
Purge
Remove unused materials from the model’s list.
Similar does not always mean duplicate. Keep separate materials if, for example, doors and worktops may need different finishes later.
Why cleanup may leave a material behind
UMM checks hidden objects and component definitions, as well as saved variants. Merge Duplicates can also leave a material that is still used by a locked object. Read the result before assuming cleanup failed.
Before merging similar materials, compare their images, texture sizes, colors and transparency. Save a model copy before discarding alternatives.
07 / RENDERING & SHARING
Make the next
finish change easier
An imported model has three door materials. If the doors should always match, replace those finishes with one chosen oak.
- Door finish 01
- Door finish 02
- Door finish 03
Already painted?
Replace Materials swaps the old finishes for your chosen material.
Use Replace Materials →Need separate finishes?
Materializer creates materials from groups, components or tags—for example, one each for walls, doors and worktops.
Use Materializer →Test a small export first. Check texture size, direction, transparency and face sides. Different renderers can show different results.
Sharing saved finish options
Material Variants saves alternative material choices. Apply the look you want to share, then save and send the complete SKP.
The recipient can view that look without UMM. They need UMM to switch between the saved options.
What travels with the file?
Variants store choices for objects or faces added to a Variant Set, plus supported texture positions. Copying objects alone does not transfer the model’s Variant Sets. After deleting objects or cleaning up materials, check that the options still work.
Choose what a variant controls →